https://www.homegameauction.com/blogs/post.atom homegameauction - homegameauction Blog - Festival Fashion and Rave Culture 2024-06-28T14:46:53-07:00 homegameauction https://www.homegameauction.com/blogs/post/how-to-trade-kandi-at-a-rave 2023-10-06T15:30:00-07:00 2023-12-21T13:23:22-08:00 How to Trade Kandi at a Rave Julia Sachs Ever witnessed or heard stories about people swapping brightly colored beaded bracelets (AKA kandi) around you at Festival - usually while doing some type of secret handshake? Maybe you've been curious about what exactly is happening? If you’ve been wondering how to trade kandi at a rave, we’ve got the tips, tricks, and etiquette rules you need to know before you get started. 

More

]]>
You don’t have to spend very much time at a rave or (edm) festival to notice the brightly colored beaded bracelets, necklaces, and accessories that many ravers are wearing. These colorful accessories are called kandi, and they’re a major part of the scene and are totally unique to rave culture.

You may have heard stories or witnessed people swapping kandi around you, usually while doing some type of secret handshake, and you might be curious about what exactly is happening. If you’ve been wondering how to trade kandi at a rave, we’ve got the tips, tricks, and etiquette rules you need to know before you get started. 

What is Kandi?

Most people use the term “kandi” to describe brightly colored beaded bracelets that are usually made with pony beads (those plastic beads you used to make bracelets as a kid).

Today, kandi can be used to describe beaded bracelets, necklaces, masks, and even clothing, as people have become more and more creative in the way they use their beads. Kandi is a distinctive and unique part of rave culture and is designed to be given away or traded away as a sign of PLUR culture - peace, love, unity, and respect. 

sunflowerraver

Photo Credit: @sunflowerraver 

Hypnotic Haze outfit

Where does PLUR come from?

It might seem a bit strange that a subculture would have its own motto, but that’s exactly the case with raves and the PLUR lifestyle. What’s ironic is that the PLUR motto actually came from a decidedly un-PLUR situation.

As the story goes, New York DJ Frankie Bones was playing at a rave in the Bronx on July 24, 1993. A fight broke out in the crowd and ended up spilling over onto Bones’ deck. He grabbed the microphone and shouted “You better start showing some peace, love, and unity or I will break your f*cking faces!”

The story of the humorous moment ended up spreading throughout the 90s rave scene like wildfire and was a testimony to the difficulties and struggles surrounding the early scene.

Ever since, PLUR culture has been synonymous with the rave scene, and today, ravers demonstrate respect and love to everyone while expressing themselves and dancing the night away in peace and unity. Kandi is symbolic of PLUR culture and symbolizes a strong connection made between two people at a rave or festival.

Groovin' Bloomin' Outfit

Making Kandi

One of the most special parts of trading kandi actually occurs before the trade even happens while making kandi. Although some people choose to buy kandi, this is generally frowned upon in kandi etiquette , because kandi is supposed to be meaningful, special, and unique.

With that said, if you don’t have time to make kandi before your next festival and you don’t want to show up empty handed, you’ll be forgiven for buying it. Making kandi requires just a few simple supplies. To make kandi, you’ll need:

  • Pony beads (or beads of your choice)
  • String (elastic string preferred)
  • Scissors
  • A ruler

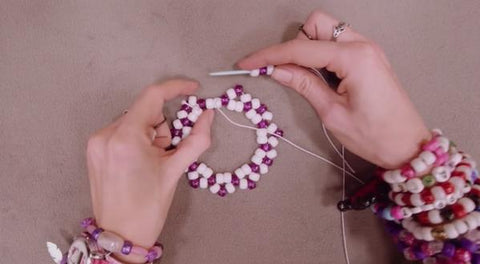
If you’re new to making kandi or arts and crafts aren’t exactly your strong suit, start by making a simple single strand bead bracelet. These are the easiest to make and are also the most commonly traded with other people. As a bonus, it’s easy to get creative, and they’re inexpensive to make.

You can personalize your bracelets using letter beads to create phrases or write out the person’s name, and you can also add charms and unique beads that reflect your interests or the interests of the person you’re making them for. Most people wear layers of kandi bracelets stacked up their arms for dramatic effect, but they can also be stitched together to form a cuff if you’re looking to get a little fancier.

Kandi can pretty much be made in any form, including 3D bracelets, necklaces, perlers, masks, and even clothing, if you’re particularly talented with your beadwork.

If you’ve never heard of perlers, they’re a unique type of necklace made of small, heat activated beads (called perler beads) that fuse together when heated. Perlers can be made to resemble certain cartoon characters, shapes, symbols, and patterns, and the only limit on what they can be is your creativity.

how to make kandi

Check out this blog post for how to make your own 3D Kandi Cuff!

Melty Fantasy Buckle Top and Bottoms 

Trading Kandi

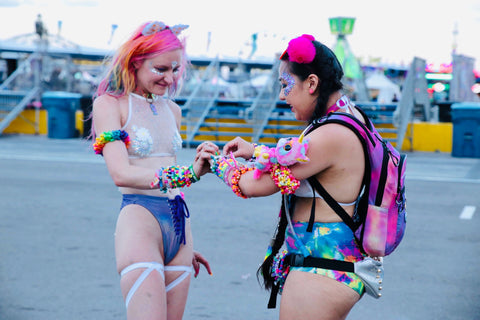
Once you’ve made your kandi, it’s time for the fun part - trading it! While it might seem as simple as walking up to the nearest person and asking to swap, there’s actually some fairly specific kandi trading etiquette that should be followed, and a specific process that usually goes down.

Kandi is traded when you make a special connection with someone, whether it be a person you met in line for the porta-potties, your BFF, or the hot guy dancing next to you all night. This creates special meaning and memories behind the kandi you trade, and those memories can stick with you for years to come. 

trading kandi 

PLUR Handshake

As a general rule, kandi is always swapped after doing the PLUR handshake. Yes, rave culture has its own secret handshake, and learning it is kandi-essential! To perform the PLUR handshake, you’ll draw out the symbols of the motto with your fingers to spell out P (peace), L (love), U (unity), and R (respect).

  1. For peace, use your index and middle fingers to make a peace sign and touch your fingers to the other person’s fingers.
  2. For love, make half of a heart shape with your hand and touch your half to the other person’s half.
  3. For unity, clasp the other person’s hand and interlock fingers with them.
  4. For respect, trade your kandi through your interlocked hands, one at a time.

That’s it! If you’re trading necklaces, use both hands to perform the handshake during necklace trades, but otherwise, use just one hand to swap bracelets.

Lunita x iHR Sweet Serendipity Punk Princess Bodysuit

Kandi Trading Etiquette

Now it’s time to discuss a few kandi trading etiquette guidelines. Of course, always do the PLUR handshake when trading kandi, but besides that, you’ll want to follow the rest of these guidelines as well.

  • Don’t ask for specific pieces: It’s considered rude to ask for specific pieces of kandi from someone. Kandi should be traded organically, and the person giving you kandi will select a specific piece for you based on qualities that they may see in you, memories you share together, or other meaningful characteristics. Remember, kandi is all about celebrating a connection, and asking for specific pieces of kandi doesn’t help to build that connection.
  • Don’t randomly ask for kandi without a connection: We’ve emphasized how important the connection is to kandi trading, so it should go without saying that you need to establish a connection with someone and get to know them before trading. If you approach the first person that you see wearing kandi and ask for some, they will probably still give it to you, but you’re missing the point of trading entirely, which is to share something special.
  • Don’t trade pieces that you have received: It’s considered bad form to trade pieces of kandi that have been given to you, since they were given to you based on another person’s connection with you. Many ravers have kandi on one arm that they have been given and on another that they have created to give away. Keep the kandi you’ve received so that you can hold onto the memories associated with them!
  • Don’t trade pieces that were made specially for you: Elaborating on the etiquette tip above, never trade kandi pieces that were made specially for you. If someone took the time to make you kandi specifically because they thought you would like it, honor that connection and hold onto it.
  • Create the kandi you want to receive: Consider it the golden rule of kandi: create the kandi you want to receive. Remember to put just as much love into creating your kandi as you hope to receive from it.
  • Trade something else if  you don’t have kandi: If you don’t have any kandi to give away, that’s ok! It’s fine to trade something else in exchange, and sometimes, that can be an even more special way of creating a memory. 

Sugar Venom Lace Up Outfit

Left Arm vs Right Arm

When it comes to kandi trading, both arms are not created equal. Generally speaking, most kandi traders keep the kandi that they are willing to trade on their right arm and their “untradeable” kandi on their left arm.

Kandi that is untradeable might have special meaning, have been given to the person, or go with the theme of the person’s costume. While everyone is different, this is a general rule. If someone offers for you to choose a piece of kandi when you’re trading, make sure to ask if there are any pieces that are off limits, just to be careful.

Giving Kandi

Of course, you don’t have to trade kandi if you don’t want to - you can just give it away! If you see someone who is kandi-less or who looks particularly lonely or sad, giving them kandi can be a way to lift their spirits and bring them into the PLUR lifestyle. Kandi is about spreading PLUR wherever you go, so take the opportunity to give it away whenever you can.

raver wearing kaskade kandi

Photo Credit: @lauren_hutzel_4

]]>
https://www.homegameauction.com/blogs/post/the-meaning-behind-kandi-edclv-edition 2021-08-31T11:30:00-07:00 2022-03-04T11:57:55-08:00 The Meaning Behind Kandi: EDCLV Edition Kellie Burch During my first Electric Daisy Carnival in 2013, I met so many beautiful souls and I can still tell you who gave me a specific kandi during a special moment. In honor of EDC, I wanted to share fellow raver’s memorable kandi moments from past kandi-trading experiences. 

More

]]>
At first glance, a bracelet made of colorful pony beads may seem like a tacky fashion accessory, but for ravers, those bracelets hold a special place in our heart. Also known as kandi, these bracelets that we trade at festivals with friends or with strangers we cross paths with at events, symbolizes the moment that we connected with someone else. Although I don't personally make or wear as much kandi to events anymore, I love everything it stands for and seeing the creativity put into it. The tiny details that we often don't notice, the bead that we never even thought of using or a charm that we've never seen at a Michael's, is one of the few things that make kandi amazing. During my first Electric Daisy Carnival in 2013, I met so many beautiful souls and I could tell you who gave me a specific kandi during a special moment. In honor of EDC, I wanted to share fellow raver’s memorable kandi moments from past years.

Stephanie (@__zomgsteph)

multicolored bead bracelets

“Back in the day when I was still a huge kandi kid, I made it my mission to make kandi for every person in my rave family. 2014-2016 was a rough period with my last rave family, the drama nearly tearing apart all of the group. I still keep in touch with some of them, but I could tell that things would never be the same. Once 2016 came around, I began raving with a new group of friends who were new to the rave scene. I made these cuffs to commemorate our first EDC together as a rave family with their given rave names written on the back of the flowers. It was one of the first EDC’s where everything went smoothly, everyone took care of one another, and had an awesome weekend dancing under the electric sky.”


Nick (@nick_badbird_jones)

Kandi kids trading intricate bead bracelets

“Getting to trade with someone who has inspired me in my kandi journey was one of the highlights of EDCLV 2017. Walking through the tunnel on day one, he was the first person I saw and traded with by chance. It was pure magic with that unbelievable backdrop. The big cuff on my arm is the one he traded me and the big one he’s wearing I made! Anyone who follows @bboysfear knows his kandi making level is out of this world! His designs pushed me to use more expensive string beads and colors to my kandi! He really helped me find my own unique style!”


Lily (@lily2silly)

rave girls wearing white festival outfits

“So my friend Elina (IG: @medusaxrose) traded me this beautiful pink hello kitty kandi cuff I was eyeing forever;  little did I know it was for me! I've seen her way before EDC and we became friends a bit before Beyond Wonderland 2017, but since Beyond we were raving together all the time. I love her spirit her personality and she's my go to when I want dress all matchy matchy. Elina is like the ying and I'm yang, her being this bad ass me being all cutesy. We always have a match day and she inspires me to be more out the box with my style. If it wasn't for her, I wouldn't have found my new rave fam. She kept me from leaving the rave scene when I lost my rave fam that came before her and I'm glad she convince me to stay!”

Tate (@tateknm)

colorful bead necklace with large bead charm

“Although I didn’t know him that well, I just felt Caleb was a genuine person. Sometimes I make kandi with no specific person in mind. I save them until the right person comes along. He’s a volunteer for Conscious Crew, a nonprofit group that focuses on safety at Washington raves. Caleb always remembers my name, says hi to me, and gives hugs. He asked if I wanted to trade someday and I asked what he likes, he said spongebob. Then I said, ‘Ohh actually I have something for you now.’ Then I gave him my Smitty perler and he cried!”

Norma

simple kandi bead bracelet

“After having really bad depression, my two-year-old boy was desperate to get me out of the house as I would always be sleeping. He would play the song on my phone “You Are a Cinema” by Benny Benassi all the time until he would get me out of bed to buy donuts or whatever. Fast forward to my first EDC 2015 and this guy from Miami trades kandi with me for the first time and he gives me this single, exactly as if he knew this song is very special to me, and it got me out of my depression.”

Miguel (@miiggguelito)

intricate beaded necklace with large bead charms

“EDC 2016 was such a life-changing, transformative experience. I went into Vegas ready to have the time of my life and gained so much more. The bond and love cultivated that weekend with my rave fam, strangers, old friends, new friends, foreign friends, will hold a special place where Peace, Love, Unity, and Respect allow multitudes of people to come together in one place without the worry of judgement or worries of the outside world. Keep the love going because it is what makes this community the best out there. This piece is symbolic of the journey raving and EDM has taken me in. Thank you to my family Jacob (IG: @ecua_salvi_93)  and Salena (IG: @salenamour) for blessing me with such a beautiful piece. I have learned so much about what it means to be a raver through you both and I am so honored to call ya’ll 87 Fam, family, blood, and rave fam. I can’t picture the rest of my life without the both of you in it.”

  • Leslie

    Kandi kids trading meaningful bead bracelets

    “This story is from EDC in 2014. I was on my way to EDC in 2014 and my friend that I was driving out there with was reminiscing about a rave we’d been to in the Bay Area about 9 months before. She and I had only raved together a couple times before EDC and she didn’t know a lot of my friends that we’d been with that night so she was trying to figure out who of them were going to be with us at EDC that year. She asked me what the name of the “blue fuzzy hat guy” was and I replied that I had no idea who she was talking about. She pulls up pictures from that night and he’s in all our photos. I reply that I didn’t actually know him and had only briefly chatted with him that night. She said she thought he was my friend couldn’t believe I didn’t know him since we she chatted to him all night. We laughed about this. Flash forward to night two of EDC and from across the crowd she spots blue fuzzy hat guy!!!!!!! She and I had just split up and she grabs his hand and drags him through the crowd back to where I was standing. We all embrace and it was a beautiful moment. We end up trading Kandi and I give him one I’d made that I really loved - a piece of squishy toast that said “I Knead U” on it. We exchange contact numbers because we’re both from the Bay Area and say we’ll try to meet up the next day. Day 3 passes and we never text each other. I hadn’t even saved his number in my phone. Around 11am on Monday morning (I’ve only been asleep for about 30 minutes) and my phone starts to ring - a random 415 number. I think, "holy shit if this is Walgreens or something I will kill someone." Turns out, it’s blue fuzzy hat guy and they totaled their car on the way back from EDC and they were desperately calling anyone they knew headed to the Bay looking for space in a car because they had to be at work in the morning. We had two seats in our car so we ended up driving them all the way back to San Francisco. Blue Fuzzy Hat guy (Will is his real name!) and I have been great friends ever since. Turns out he’s the one who “kneaded” me. He still has the Kandi to this day and we love to share that story of how our friendship and to be!

    From kandi kids decked in cuffs or just wearing a few singles, kandi represents the hours of meticulous hard work ravers put into each piece. You don't have to be a pro at making a beautiful kandi to make it meaningful, but the symbolism and memories behind the kandi is what makes it special. I hope you all have an amazing EDC and create your very own magical kandi experience! To learn how to make Kandi on your own, check out our guide published here!

    ]]>
    https://www.homegameauction.com/blogs/post/how-to-make-kandi 2021-07-26T11:00:02-07:00 2022-03-04T10:20:03-08:00 How To Make Kandi Julia Sachs Whether you are new to the community or a veteran raver, trading kandi is special for many people. Here is a tutorial on how to make kandi bracelets, perlers, and some videos on YouTube if you want to challenge yourself and make kandi cuffs!

    More

    ]]>
    Kandi has been a very important part of EDM culture for years. When I first got introduced to raving, one of the first things I was taught was how to make kandi and trade with people using the PLUR handshake. If you attend an event with the intention to meet people, trading kandi can help you make new friends. Whether you are new to the community or a veteran raver, trading kandi is special for many people. Here is a tutorial on how to make kandi bracelets, perlers, and some videos on YouTube if you want to challenge yourself and make kandi cuffs!

    Kandi

    Photo Credit: @liyakitten

    Kandi Singles


    how to make kandi
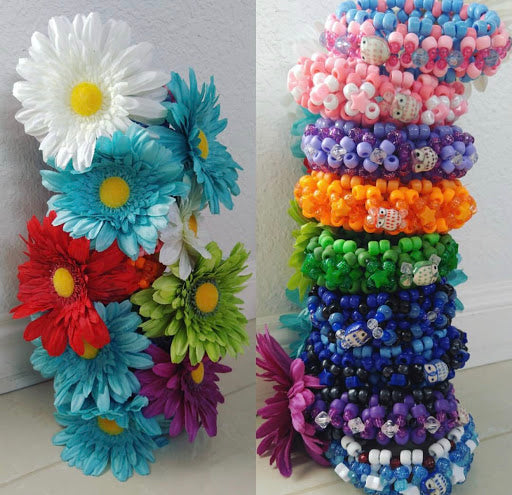
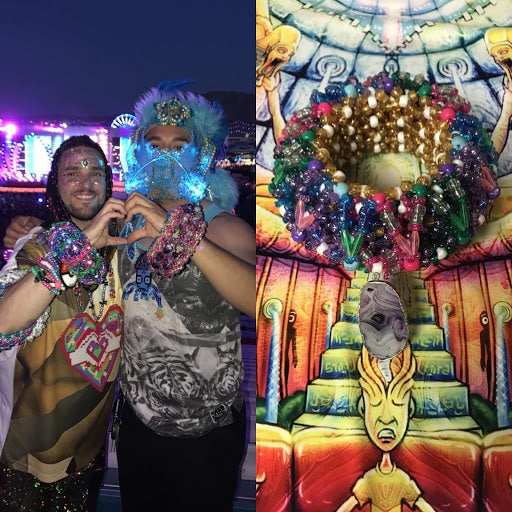
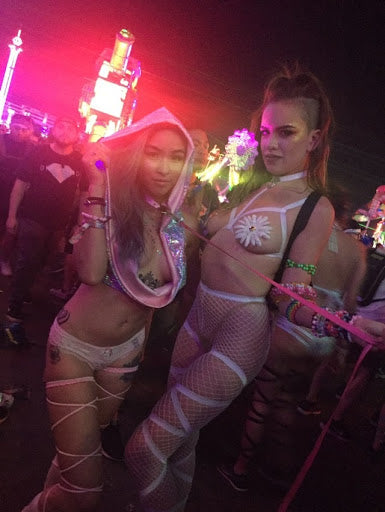
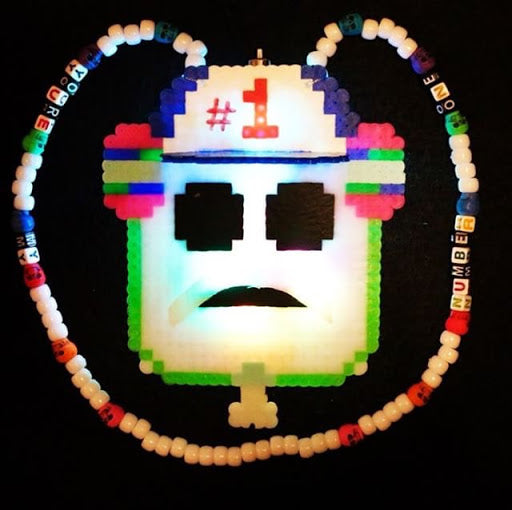
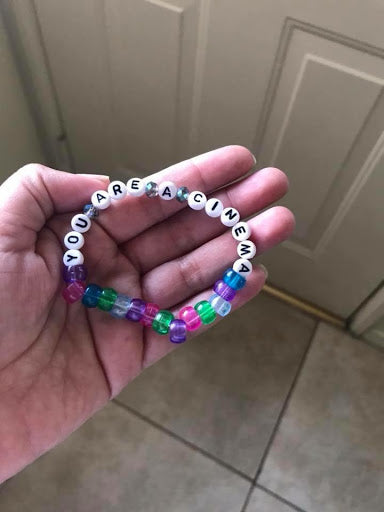
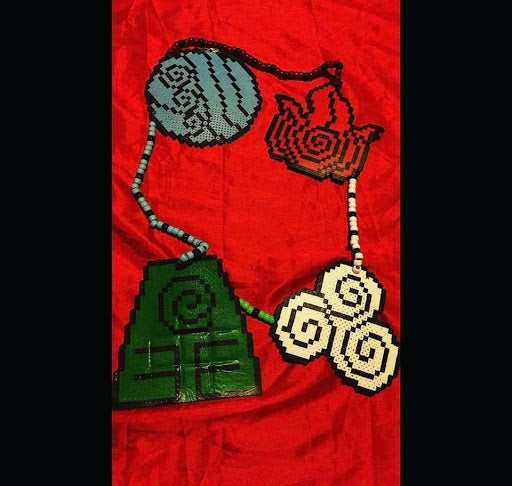
Photo Credit: @kandi_diva

    Materials:

    Pony Beads
    Decorative Beads (could be made of wood, glass, plastic, etc)
    Letter Beads
    Elastic String

    1. Take your elastic string and wrap it around your wrist to see approximately how much string you will need for one bracelet. Cut the desired amount with some extra string so that it is easy to adjust later
    2. Decide on a pattern that you want for your bracelet, or if you want any words on them. Some words I personally like to use for singles are “PLUR”, “rave girl”, name of the festival, or artist names.raver kandi
    3. Put the beads through the string. Put desired letters in the middle and equal number of pony and decorative beads on both sides of the letters. A good number of beads to have on a bracelet is around 30.
    4. Tie the string off at the end, double knotting is recommended. Cut off excess string.
    5. Trade your kandi with someone at a show or festival!

    rave kandi

    Kandi Cuffs

    Since there are many types of kandi cuffs, here are some Youtube tutorials for them that are very easy to follow!

    Rainbow striped peyote kandi cuff tutorial by Kandi Toybox

    3D Cuff - [Kandi Tutorial] by Ginger CandE

    X-Base Cuff - [Kandi Tutorial] by Ginger CandE

    liyakitten

    Photo Credit: @liyakitten

    Perler Necklaces

    Materials:
    Perler Beads (usually sold at craft stores)
    Perler pegboard
    Pattern
    Masking tape
    Large needle
    Parchment paper
    Beads for necklace
    Elastic string
    Iron

    1. Pick a pattern to use for your project. A good place to look for patterns are Google and Pinterest if you are looking for anything specific. If you are wanting to turn an image into a pattern, websites such as Beadifier lets you upload your own image to create a pattern. iheartraves
    2. Lay your perler pegboard on a flat work surface. Start with the dark outline first to make sure  your design fits on the board. If you have the large tub of perler beads, separating your colors before you start your project will make this process a lot easier!

    3. Fill in the rest with your perler beads. You can either follow the pattern or be creative and use completely different colors.

    4. Once you have all the beads laid out on the board and it’s ready to be melted, lay masking tape on top of your project. Go slow on this step (I’ve messed up many projects up rushing through this), and make sure you press down on the tape to make sure the beads are stuck to it. Use a needle and poke holes over the tape. This step is optional but highly recommended. Melting your project direct on the pegboard can warp your board over time. iheartraves kandi

    5. Slowly and carefully peel the edges of the tape off and flip the pegboard. For bigger projects, it’s highly recommended to flip your piece with cardboard on the other side for stability.
    6. Lay your project on a flat surface with the taped side down and lay parchment paper on top of your perler. Plug the iron in and set it to low/medium heat and melt the beads over the parchment paper by moving the iron in slow, circular motions.

    7. Once the beads are melted (the holes in the beads will look smaller), carefully take the tape off, flip your project and repeat step 6. iheartraves perler

    8. Wait for perler to cool down. Put flat, heavy objects such as books on top of it so the perler will be flat when it cools. 

    9. Poke two holes on the top of the perler, one on each side. Cut a long piece of elastic string and string it through one of the holes so the string folds in half. Put beads through both strings but make sure to leave some room at the end of it so you can tie it. Then string one side of the string through the second hole and make a knot. 

    10. Your perler necklace is done! Take it to a rave or festival and trade it with someone you vibe with!


    ]]>
    https://www.homegameauction.com/blogs/post/how-to-make-a-perler-necklace 2020-04-29T12:37:00-07:00 2022-03-03T15:05:27-08:00 How to Make a Perler Necklace with @Kandi_Diva Kellie Burch Perler beads are awesome because you can basically make any shape you want! From your favorite Pokemon to more basic shapes like mushrooms, hearts, and stars, you can create whatever you're vibin' with. If you're ready to take your perler skills to the next level, check out this tutorial with @kandi_diva

    More

    ]]>
    Are you ready to take your kandi making skills to the next level? After bracelets, and cuffs, next comes perler bead art! Perlers are awesome because you can basically make any shape you want. From your favorite Pokemon to more basic shapes like mushrooms, hearts and stars, you can create perler bead patters into whatever you're vibin' with.

    Kandi master, @kandi_diva created this tutorial to show you how to make an awesome glow-in-the-dark perler! Then, she'll show you how to turn it into a perler neckalce.

    To get started, check out the video, or read the steps below.

    How to Make a Perler Bead Necklace: 

    Step 1: Gather the supplies:

    You will need: 

    • 5 different colors of perler beads
    • 2-3 perler pegboards
    • Wax paper
    • Iron (optional)
    • Tweezers (optional)

    Step 2: 

    Print this design (or draw your own!) perler design on a piece of paper and place pegboards on top. 

     alien perler necklace template


    Step 3: 

    First, begin by making the outline of the alien using 1 color, then fill it in with glow in the dark beads.


    Step 4: 

    Next, move on to the outline of one side of the bow. Begin by filling in the outline of the bow, then fill in the flowers with some fun colored beads to give it some flair. 


    Step 5: Add the additional pegboards 

    Add two pegboards to both sides in order to finish the outline of the bow. Then fill in the inside of the bow. 


    Step 6: 

    Repeat step 5 for the opposite side of the bow. 


    Step 7: Iron your perler

    Once you have all the beads added to the pegboards, get a piece of wax paper and cover your perler. Make sure your iron is hot and ready to go before you start ironing. Iron the entire upper side of the perler until you can see the perler beads all melted together through the wax paper. Then, flip the perler over and fold the wax paper over the backside. Lightly iron the other side so the beads are fused on both sides.


    Step 8: Make Your Perler Sparkle!

    You will need:

    • Hot Glue Gun
    • Small makeup brush
    • Glitter/Rhinestones

    Apply a little hot glue in the area you would like the glitter to be. Use the small makeup brush to push the glitter into the glue.

    Periodically, flip the peeler over and tap the back of the perler to remove the excess glitter and make sure the glitter is in all the right places.

    To add rhinestones, add a tiny dot of glue in the are you would like them, then gently place the rhinestones.


    Step 9: Turn your perler into a necklace

    You will need:

    • Beads
    • String
    • Scissors

    Feed the string through the peeler, then add the beads to the other side of the perler. After adding 6 beads, add an accent bead to create a pattern. Repeat this process until you feel you’ve added enough beads for the necklace to sit comfortably on your neck.


    Step 10: Make it Extra Sturdy

    Reloop the string back up through the first accent bead so that you have beads coming out of the front and back of both sides of the perler necklace. Tie a knot on both sides and then cut the excess.

    And - tada, you’re all done!

    raver wearing a perler necklace, neon fringe skirt and pink mesh crop top

    Get @Kandi_diva's look: Festival Queen Fringe Skirt, Freaky Fishnet Ultra Crop TopCosmic Shock Cut Out Crop TopPair of Non-Slip Neon Pink Leg WrapsPair of Non-Slip Neon Yellow Leg Wraps

    ]]>
    https://www.homegameauction.com/blogs/post/3d-kandi-cuff-tutorial 2020-04-07T12:17:00-07:00 2022-03-04T11:47:22-08:00 3D Kandi Cuff Tutorial Dot Yuson

    Wondering how to make a 3D cuff? 3D cuffs start out with a simple X-based cuff and then can be built out to create multiple layers and for a fun 3D look.  Typically there is some kind of small toy, charm or even a pearler that gets added to the finished project. Check out this article for tutorials from @misshalcyon441 and Rose the Raver.

    More

    ]]>
    Have you ever wanted to delve into the world of making kandi cuffs, but didn't quite know where to start? Here's your chance to learn from experts who have been there! Here's what kandi cuff expert, Ducky AKA @misshalcyon441 has to say!


    How Do I Make a 3D Kandi Cuff?

    This is my most frequently asked question and here's my guide on just that! Whether you're a newbie kandi kid, or seasoned raver who wants to try something new, this tutorial breaks it down into how to make the base and how to build it up into a 3D kandi cuff. Happy creating! - Ducky AKA @misshalcyon441


    Looking for more Kandi Cuff Ideas?

    Check out this step-by-step guide for making a Hello Kitty 3D kandi cuff from Rose The Raver:

    Hello Kitty Kandi Cuff Instructions:

    This 3D cuff starts out with a simple X-based cuff and then can be built out to create multiple layers and for a fun 3D look. First, pick your charm or small toy, like this Hello Kitty charm to add to your 3D kandi cuff. 

    3D Cuff Tutorial-1

    Getting Started:

    For this project you will need the following supplies:

    1. Pony beads in various colors to match your charm and pattern
    2. Elastic (at least a card)
    3. Plastic yarn needle
    4. Scissors
    5. Charm, plastic figure or peeler
    6. Lighter
    7. Sharp quilting needle
    8. Optional small cups to separate out beads by color

    Next, you're ready to come up with a pattern and start your 3D kandi cuff. 

    Starting the Base:

    1. Begin by selecting two colors and stringing them onto the elastic in the following pattern two main color and one accent color.
    2. Repeat two main beads one accent bead until the end.  By the end, you will have a total of 11 sets or 33 beads.  Test this single on your arm for fit.
    3. Adjust the pattern by sets of three to increase or decrease the size.  I find that 33 is a good size for the upper arm of a smaller woman, for guys upper arms I would go up to 39 beads or 13 sets. 
    4. Once you have adjusted the size for your arm tie off the single with a double knot.  Do not cut the elastic, you will need almost the whole card for this one project.  Feel free to adjust the colors to fit the charm you want to add on or just your favorite colors.

    3D Cuff Tutorial-2

    Adding the 2nd Layer of Beads:

    1. Next, you will string three beads on the elastic: one main bead, one accent bead, and another main bead.
    2. Then take the needle with the elastic threaded on it and put it through the first accent bead to the left of where you tied off the single.
    3. Pull the needle through tightening up the elastic but don’t pull it too tight, you still want the elastic to have a little give. 
    4. Repeat this pattern over and over through each accent bead with one main bead, one accent bead and one main bead stringing it through the next accent bead on the base single.
    5. Continue with this pattern in a counter clockwise rotation until you reach the last accent bead on the base single.  

    3D Cuff Tutorial-3

    Adding Height to Your Kandi Cuff:

    1. String on the last set of 3 beads and put the needle through the last accent bead on the base row as well as the main bead and accent bead of the next row up which is also the row you just completed.
    2. To start the next row string 1 main bead, 1 accent bead, and 1 main bead onto the elastic and string the needle through the next accent bead to the left following the pattern around counter-clockwise. 
    3. Continue this pattern adding more and more rows. The cuff will fan open at first as seen here but don’t worry, the cuff will start to take shape around row three.  Be sure you keep the elastic tight, but not to tight.  The fanning out effect will be fixed when the last row is added to the inner cuff.
    4. Keep adding rows until you get your desired height, but remember to make it an odd number so the pattern works out.  For the example shown I have 5 rows (including the base) and then the closing or top row.  

    3D Cuff Tutorial-4

    Start Building the Outer Ring:

    1. Once you have reached your desired height add 2 more main beads between each accent bead and tie off the inner cuff with a double knot, but remember not to cut the elastic. 
    2. Select the next 3 beads for your pattern: 2 outers, 2 inner and 1 middle. 
    3. String the beads on the needle in the following order outer, inner, middle, inner than outer.
    4. Count 3 accent beads down diagonally on the cuff from where you tied it off and string the needle through the accent bead.
    5. String the same pattern outer, inner, middle, inner then outer and count up 3 accent beads diagonally and string the needle through. Follow this zig-zag pattern all the way around the top rows of the cuff. 
    6. Once you have completed the zig-zag pattern all the way around the top of the cuff you will cross back over to make an X pattern. 
    7. String 1 outer and 1 inner bead on to the needle then put the needle through the middle bead and string on one inner and outer bead and string through the third diagonal accent bead on the base cuff. 
    8. Follow this same pattern going through the middle bead each time to create an X pattern with the beads.

    3D Cuff Tutorial-5

    Almost there! The Final Steps:

    1. Keep following this pattern around the cuff until you have an X pattern all the way around the top row (what was previously three rows) of the cuff.  Then follow the same pattern for the bottom rows until you have the X pattern all the way around the cuff.
    2. Select your last pattern of beads: For the outer X pattern you will need to place the beads in the following order first outer bead, second outer bead, first inner bead, second inner bead then string the needle through the middle accent bead, second inner bead, first inner bead, second outer bead, and first outer bead. 
    3. Then string the needle through the middle bead in the previous level.  Follow this order with the zig-zag pattern stringing the needle through the middle bead on the lower level each time.
    4. Once you complete the zigzag all the way around go back the other way again completing the X pattern. 
    5. String the beads in the following pattern first outer bead, second outer bead, first inner bead, second inner bead then string the needle through the middle accent bead, once through the accent bead follow the pattern second inner bead, first inner bead, second outer bead, first outer bead then through the middle of the X on the lower level of the cuff.  Follow this order until you get to the second to last X.

    3D Cuff Tutorial-6

    Add Charms and the Finishing Touches:

    1. On the last X string add on the charm you want to use.  I’m using a plastic Hello Kitty figure.  You can turn any soft plastic toy into a bead by carefully heating up a needle with a lighter and poking a hole through the soft plastic. 
    2. Then string it on following the same pattern as the beads before tying the cuff off with a triple knot and cutting the string. 
    3. You can add letter beads or other accents to the pattern if you want to make it more personal and original.  
    4. If you are adding a perler finish off the cuff pattern all the way around and then use clear elastic to sew it to the cuff in a few different places to ensure it secured.
    That’s the basics for a 3D cuff, but there is so much room for creativity! 

      You can make the huge so they become epic cuffs or you can make them really small and cute.  The outer row doesn’t have to follow the X pattern either you could make the rows go around. The sky’s the limit, just play around with it until you find something you like.

      3D Cuff Tutorial-7

      We’d love to hear your feedback, let us know what you want to see in the future! 

      ]]>
      https://www.homegameauction.com/blogs/post/unicorn-perler 2019-08-02T12:14:00-07:00 2022-03-03T14:02:26-08:00 Unicorn Perler: DIY Kellie Burch Making kandi has always been special for me, and when I introduce new friends to raving, I always try to teach them about making kandi and trading it with other people. For those of you who aren’t familiar with kandi: kandi are bead bracelets and necklaces that ravers trade at shows and festivals. There are many types of kandi, and here are step-by-step instruction on how to make a perler necklace to take to your next rave!

      More

      ]]>
      Kandi and trading kandi is a huge part of rave culture. It’s a way to be creative and give something special to the people around you while you feel the music at a show. Making kandi has always been special for me, and when I introduce new friends to raving, I always try to teach them about making kandi and trading it with other people. For those of you who aren’t familiar with kandi: kandi are bead bracelets and necklaces that ravers trade at shows and festivals. There are many types of kandi.

      Here are step-by-step instruction on how to make kandi, specifically how to make perlers to take to your next rave!

      Materials:

      • Perler Beads (usually sold at craft stores, sometimes called hamma beads)
      • Perler pegboard
      • Pattern Masking Tape
      • Needle
      • Parchment Paper
      • Beads for necklace
      • String Iron


      1. Pick a pattern to use for your project.

      A good place to look for patterns are Google and Pintrest if you are looking for anything specific. If you are wanting to turn an image into a pattern, websites such as Beadifier lets you upload your own image to create a pattern. For the purpose of this article, I created a unicorn perler necklace. 

      Unicorn Perler Template

      2. Lay your perler pegboard on a flat work surface.

      Start with the dark outline first to make sure your design fits on the board. If you have the large tub of perler beads, separating your colors before you start your project will make this process a lot easier!

      How to Make a Unicorn Perler


      3. Fill in the rest with your perler beads.

      You can either follow the pattern or be creative and use completely different colors!

      Unicorn Perler step by step instructions

      4. Lay masking tape on top of your project.

      Once you have all the beads laid out on the board and it’s ready to be melted, lay tape down carefully. Go slow on this step (I’ve messed up many projects up rushing through this), and make sure you press down on the tape to make sure the beads are stuck to it. Use your needle and poke holes over the tape. This step is optional but highly recommended. Melting your project directly on the pegboard can warp your board over time.

      Tips for Making a Good Perler


      5. Slowly and carefully peel the edges of the tape off and flip the pegboard.

      For bigger projects, it’s highly recommended to flip your piece with cardboard on the other side for stability.


      6. Lay your project on a flat surface with the taped side down and lay parchment paper on top of your perler.

      Plug the iron in and set it to low/medium heat and melt the beads over the parchment paper by moving the iron in slow, circular motions.

      Tips for Ironing Your Perler


      7. Once the beads are melted (the holes in the beads will look smaller), carefully take the tape off

      Flip your project and repeat step 6 and 7. Wait for peler to cool down. Put flat, heavy objects such as books on top of it so the perler will be flat when it cools.


      8. Poke two holes on the top of the perler, one on each side.

      Cut a long piece of elastic string and string it through one of the holes so the string folds in half. Put beads through both strings but make sure to leave some room at the end of it so you can tie it. Then string one side of the string through the second hole and make a knot. Your perler necklace is done! Take it to a rave or festival and trade it with someone you vibe with! 

      Unicorn Perler Necklace

      ]]>
      https://www.homegameauction.com/blogs/post/fix-your-broken-kandi 2018-04-05T17:26:00-07:00 2022-03-03T13:22:46-08:00 Tips for Fixing Broken Kandi and Perlers Kellie Burch If you love wearing Kandi at raves, you’ve probably had that “OH SH*T” moment when you realize that one of your pieces has broken. Take a moment to shed a tear (I know! It totally looked cute on you), but I’m here to show you how you can save the Kandi you love.

      More

      ]]>
      If you love wearing kandi or perlers at raves, you’ve probably had that “OH SH*T” moment when you realize that one of your pieces has broken. Take a moment to shed a tear (I know! It totally looked cute on you), but I’m here to show you how you can save or transform your beautiful creation.

      Here are some tips for fixing your kandi and perler creations:


      Iron it!

      Truthfully, Perler creations are easier to save than cuffs and singles, in my opinion. Ironing is my go-to thing to do for peeler pieces that haven’t completely broken in any way. If it cracks a little during the rave, put it in your rave backpack for the night and fix it when you get back to your hotel. I’ve found that most of the places my crew and I stay have an iron, so I keep extra parchment paper with me for this purpose. Just fire the iron up, re-iron the piece, and you’re good to go!


      Turn it into a keychain

      A lot of medium to small pieces can be turned into keychains! It’s a fun way to show off your favorite creations even if you can’t wear them anymore. Sidenote: If it’s broken off the cuff or single, you might have missing pieces still attached to the bracelet. If you can safely remove the missing pieces without ruining the whole cuff/single, go ahead and do that and re-iron it back together.

      If you’re okay with the creation having some missing pieces, that works just as well! I like to slightly heat up a large sewing needle with a lighter so it goes through the fused beads without having to force it too much (But be careful, the needle can get really hot). I like to make the hole somewhere near the edge of the creation, but not so close that it’s just in danger of breaking off again. You have to find that sweet spot where the hole is close enough to the edge where you can put the keyring through without too much trouble, but far enough to where it won’t break again.

      And there you have it! Your new keychain is ready for action.

      Hang it from your rearview mirror

      This is one of my favorite ways to repurpose pieces by far. Just like before, go ahead and perform some surgery (aka re-ironing) if needed, poke a hole near the top, and use a lark’s head knot to attach the creation to string. Tie it off, and you’ve got yourself a fun, new rearview mirror dangler.


      Turn it into a pin

      You can find pins with flat backs at craft stores pretty easily. Just hot glue one to the back of a perler creation and now you have a new pin!


      Try to re-tie it

      Singles and cuffs are a little harder to fix.  Sometimes if a knot isn’t tied securely enough (if this is a recurring problem for you, check this kandi-tying article out), it may come undone during the rave. No worries! You may lose a few beads, but in my experience, I’ve noticed the cuff getting looser and slipping more before I lose too many beads.

      I’ve been able to save my cuff mid-rave by taking the end of the string that came loose and re-tying it to the string somewhere around it. If you try this, make sure to triple knot it at least. Third time’s the charm, right?

      If all else fails, it’s perfectly okay to retire a piece. Just because you feel like you can’t wear it out anymore doesn’t mean that you love it any less. I keep some Kandi that’s gotten a little too much love displayed in my room. Finding little ways like these to keep adding positivity to your life is a great reminder that PLUR doesn’t need to end when the rave does.

      These are just a few ways you can fix and repurpose creations. If you have other ways to fix perlers or kandi that are not listed here, leave us a line in the comments below. We’d love to hear!

      ]]>
      https://www.homegameauction.com/blogs/post/kandi-surgical-mask-tutorial 2015-03-04T09:28:00-08:00 2022-03-04T11:47:29-08:00 Kandi Surgical Mask Tutorial Dot Yuson Hey guys, I’m back with another lovely tutorial for you all. It’s been a while since I’ve been in the studio, but I’m happy to be back. We’ve gotten a lot of requests for this surgical kandi mask and I’m so excited to finally be able to share it with you! I know a mask is a little difficult to create and it may take a while, but don’t get frustrated and if you get lost or have any questions at all, please leave me a comment and I’ll get back to you. If you’d like to see a particular tutorial, let us know! 

      More

      ]]>

      Hey guys, I’m back with another lovely tutorial for you all. It’s been a while since I’ve been in the studio, but I’m happy to be back. We’ve gotten a lot of requests for this surgical kandi mask and I’m so excited to finally be able to share it with you! I know a mask is a little difficult to create and it may take a while, but don’t get frustrated and if you get lost or have any questions at all, please leave me a comment and I’ll get back to you. If you’d like to see a particular tutorial, let us know! 

      Stay tuned for my next tutorial!

      ]]>